Step 1 – Create a Fill Layer: on the main menu, choose Layer > New Fill Layer > Solid Color. Choose “Color” as the Mode, and leave the Opacity at 100{d4e6fabf8da02c89293759be6c8202c78433121553e67b711ceafa582bd64e7a}. (You can change that later). Click on the OK button.

Step 2 – The Photoshop Color Picker window appears. Pick a color.
In the Color Picker, you can choose a color on the left, and adjust the palette of colors with the slider, just to the right of the color window. If you slide down, your color will affect the low values more than the high values – and vice versa.
Now click on the OK button.
All Done!

Grayscale Image
Warm-Toned ImageFurther Refinements
If you chose 100{d4e6fabf8da02c89293759be6c8202c78433121553e67b711ceafa582bd64e7a} as the Opacity for this layer, the color may be too saturated. You can adjust the Opacity {d4e6fabf8da02c89293759be6c8202c78433121553e67b711ceafa582bd64e7a} of the layer to taste.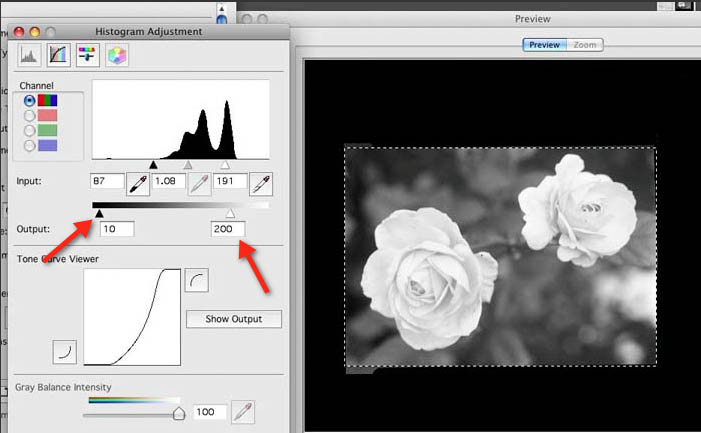
If you like the way it looks, you can now merge the Fill Layer with the background layer. Or, you can leave it as-is. Because it is merely an adjustment layer – and not a copy of the image – it doesn’t increase the size of the image.
Want a Cooler Tone?Pick a cool color.


Grayscale Image
Cool-Toned Image
Do You Prefer Pantone Colors?
If you like well-known colors such as Pantone, click on Color Libraries and choose one, whose name you can remember for the future. Photoshop gives you several libraries of colors, but you can always change them. Colors can be adjusted and specified in a number of ways: RGB, HSB, etc. You can also save a color to the Photoshop palette, and use it later. It’s probably best to use a soft color at first. You can always undo, and try again.
16-Bit Workflow: No Banding
 When we open an 8-bit grayscale image for editing, we start out with only 256 possible shades. That may sound like a lot of shades, but every time we adjust our image, we lose some of them.
When we convert to JPG format, we may lose some more shades. By the time we’re done, some of our photos may have an unnatural “digitized” look, with gaps in the tonal scale. Some people call this banding.
With color images, we get banding in each of the 3 color channels.
Why spend big money on equipment, only to lose quality every time we “adjust” an image?
Work in 16-bit mode if you can. You start out with 65,536 shades of grey. Even if you lose half of them, you still end up with a smooth image. In color, this is really 48-bit mode, since each of the Red, Green, and Blue channels gets 16 bits.

Grayscale image and warm-toned image
JPG and Quadtones: 8-bit Only
JPG only supports 8-bit color. Photoshop Duotones, Tritones, and Quadtones only work in an 8-bit color space. Converting to Quadtones is a “destructive” adjustment. Converting to JPG – even at the highest quality – is a “destructive” adjustment.
The Fill Layer method works in 16-bit color space, as a layer. It’s a non-destructive adjustment.
Before performing any adjustments, convert JPG files to 16-bit. Once the image is in 16-bits-per-channel, any adjustments will be less destructive, and you will introduce fewer gaps in the tonal range.
When you’re all done, you can convert back to 8-bit if you have to. (If you’re saving as a JPG image for the web, that down-sizing happens automatically.) Be sure to keep your 16-bit version, as your master file.